0%

读写API

HDFStore支持使用read_hdf进行读取和使用to_hdf进行写入的top-level API,类似于read_csv和to_csv的工作方式。

默认情况下,HDFStore不会丢弃全部为na的行。可以通过设置dropna = True来更改此行为。

import pandas as pd
import h5py
df_tl = pd.DataFrame({'A': list(range(5)), 'B': list(range(5))})
df_tl.to_hdf('store_tl.h5', 'table', append=True)
pd.read_hdf('store_tl.h5', 'table', where=['index>2'])

HDF数据类型

  • Fixed Format
    • 一次写入,重复读取,不可追加
    • 不可以使用where查询,比如每次获取指定key的全部内容
    • 不支持dataframe有非唯一的column
    • 相比于table格式更快的读写速度
    • 使用put或者to_hdf时的默认类型,也可以通过format='fixed’或format='f’指定类型
  • Table Format
    • 支持append操作
    • 支持删除和查询类型操作
    • 执行put或者to_hdf操作时通过设置format='table’或format='t’指定table格式
    • pd.set_option(‘io.hdf.default_format’,‘table’) 设置默认hdf format类型

在第一次append/put操作之后,您无法更改数据列(也不能转换索引)(当然,您只需读取数据并创建新表!)。

警告HDFStore对于写入不是线程安全的。底层PyTables仅支持并发读取(通过线程或进程)。如果您需要同时进行读写,则需要在单个进程中在单个线程中序列化这些操作。否则你将破坏你的数据。

TODO 验证append是否会按照index排序的例子

Hierarchical Keys

key可以包含路径,例如’/food/apple’, 存储时会自动创建sub-stores(在pytables中是groups),可以省略路径开头的’/’,’/food/apple’和’food/apple’表示相同的key。

注意:删除操作会删除子路径下的所有内容,请小心使用

df = pd.DataFrame({'A': list(range(2)), 'B': list(range(2))})
store = pd.HDFStore('hk_test.h5')
store.append('/food/apple', df)
store.append('food/orange', df)
store.append('df',df)
print(store.keys())

for (path, subgroups, subkeys) in store.walk():
    for subgroup in subgroups:
        print('GROUP: {}/{}'.format(path, subgroup))
    for subkey in subkeys:
        key = '/'.join([path, subkey])
        print('KEY: {}'.format(key))
        print(store.get(key))

print(store['food/orange'])

查询

select和delete操作可以通过查询语句对数据子集进行操作,好处是可以在非常大的数据集上只检索一小部分数据。

查询表达式:

  • 支持使用index和columns查询dataframe
  • 支持使用major_axis、minor_axis和items查询Panel
  • 如果指定data_columns,则它将被作为附加索引器

有效的比较运算符是:

=, ==, !=, >, >=, <, <=

有效的布尔表达式包括:

  • | : 或操作
  • & : 与操作
  • ( 和 ) : 分组

例子:

  • ‘index >= date’
  • “columns = [‘A’, ‘D’]”
  • “columns in [‘A’, ‘D’]”
  • ‘columns = A’
  • ‘columns == A’
  • “~(columns = [‘A’, ‘B’])”
  • ‘index > df.index[3] & string = “bar”’
  • ‘(index > df.index[3] & index <= df.index[6]) | string = “bar”’
  • “ts >= Timestamp(‘2012-02-01’)”
  • “major_axis>=20130101”

不建议通过将字符串插入查询表达式来将字符串传递给查询。只需将感兴趣的字符串分配给变量,并在表达式中使用该变量。
例如:

string = "HolyMoly'"
store.select('df', 'index == string')
store.select('dfq', "index>pd.Timestamp('20130104') & columns=['A', 'B']")
store.select('dfq', where="A>0 or C>0")
store.select('df', "columns=['A', 'B']")

删除

store.remove('wp', 'major_axis > 20000102')

警告: 请注意HDF5不会自动回收h5文件中的空格。因此,反复删除(或删除节点)并再次添加,将趋于增加文件大小。

压缩

  • complevel指定压缩强度,complevel = 0和complevel = None禁用压缩,0 <complevel <10启用压缩。
  • complib 指定压缩库,默认使用zlib
    • zlib:默认的压缩库。压缩方面的经典之作可以实现良好的压缩率,但速度有些慢。
    • lzo:快速压缩和减压。
    • bzip2:良好的压缩率。
    • blosc:快速压缩和解压缩。
    • blosc:blosclz这是blosc的默认压缩器
    • blosc:lz4:紧凑,非常流行和快速的压缩机。
    • blosc:lz4hc:LZ4的调整版本,以牺牲速度为代价产生更好的压缩比。
    • blosc:snappy:在许多地方使用的流行压缩器。
    • blosc:zlib:经典;比以前慢一些,但实现了更好的压缩比。
    • blosc:zstd:非常平衡的编解码器;它提供了上述其他压缩比,并且速度相当快。
store_compressed = pd.HDFStore('store_compressed.h5', complevel=9,complib='blosc:blosclz')

store.append('df', df, complib='zlib', complevel=5)

ptrepack

重新生成压缩文件,重写文件将回收已删除的空间,也可以改变complevel

ptrepack --chunkshape=auto --propindexes --complevel=9 --complib=blosc in.h5 out.h5

性能

  • fixed stores 读写速度快于 tables 格式,但tables支持追加、删除和查询操作
  • 可以设置chunksize=< int >来指定chunsize大小,这将会降低写入时的内存使用量
  • 设置expectedrows 可以优化读写性能
  • Duplicate rows将会被写入tables,在select时会被过滤掉

我的微信公众号:pyquant

Python量化交易实战
欢迎您扫码订阅我的微信公众号: pyquant

之前写过一篇文章实现了一个简单的双均线策略,传送门:使用Pandas开发一个双均线策略

文章最后一张图看到策略收益并没有跑赢中证500指数,想更深入的了解下具体的收益情况,可以使用pyfolio工具,这个工具是著名的量化研究平台quantopian开发的,主要用途就是对投资组合进行风险分析。

pyfolio github地址:https://github.com/quantopian/pyfolio,安装非常简单:

pip install pyfolio

安装之后导入模块

import pyfolio as pf
# silence warnings
import warnings
warnings.filterwarnings('ignore')

对上一篇文章中生成的策略回报和市场回报的series进行分析

pf.show_perf_stats(etf500['Strategy'],etf500['Market Returns'],live_start_date='2018-1-1')

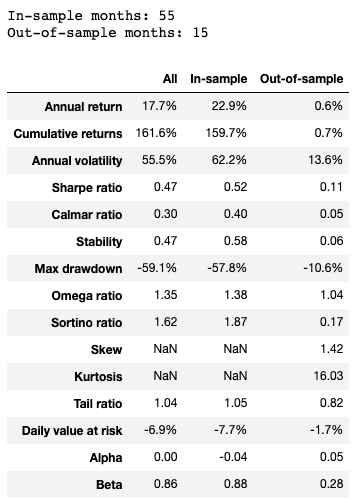
live_start_date参数是模拟策略实盘开始交易的时间点,下图中 ‘2018-1-1’ 之前的样本内数据一共有55个月,'2018-1-1’之后的样本外数据一共15个月

年化回报率为17.7%

从2013年3月15日开始累计投资回报率为161.6%

整体测试时间段内的最大回撤为59.1%,夏普值只有0.47

我们再来看下最大回测的时间段,下图显示最大回撤发生在2015年6月12日 - 2019年2月20日,累计最大回撤59.12%,2015年6月12日刚好是股灾开始的时候,惨痛的回忆。。。

pf.show_worst_drawdown_periods(etf500['Strategy'])

其实这个策略还有优化的空间,下一篇文章介绍下如果对双均线策略进行参数优化。

我的微信公众号:pyquant

Python量化交易实战
欢迎您扫码订阅我的微信公众号: pyquant

最近在使用jupyter运行多进程程序时,发现重启jupyter notebook偶尔会留下一些僵尸进程,应该是python父进程被终止之后子进程没有被正确释放造成的。僵尸进程依然会占用系统资源,如果不及时清理可能会严重影响系统性能。

先解释下什么是僵尸进程

僵尸进程是当子进程比父进程先结束,而父进程又没有回收子进程,释放子进程占用的资源,此时子进程将成为一个僵尸进程。如果父进程先退出 ,子进程被init接管,子进程退出后init会回收其占用的相关资源。

在UNIX 系统中,一个进程结束了,但是他的父进程没有等待(调用wait / waitpid)他, 那么他将变成一个僵尸进程。
— 百度百科

在jupyter中使用多进程执行程序时,如果程序还没有执行完成就点击菜单栏的 Kernel -> Restart xxx,就有可能会造成僵尸进程。

如何检查僵尸进程是否存在呢?在命令行中执行如下命令就可以返回僵尸进程状态、父进程ID、进程ID和执行的具体命令:

ps -A -ostat,ppid,pid,cmd | grep -e '^[Zz]'

杀死僵尸进程也比较容易,执行如下命令就可以清理僵尸进程:

kill -9 `ps -A -ostat,ppid,pid,cmd | grep -e '^[Zz]' | awk '{print $2}'`

我的微信公众号:pyquant

Python量化交易实战
欢迎您扫码订阅我的微信公众号: pyquant

我的微信公众号:pyquant

大家好,这篇文章我将使用Pandas创建一个简单的均线交叉策略,以500ETF作为标的物进行回测

移动平均线可能是技术指标里的"hello world"了,常用的均线有5、10、20、60、120日均线,在其他时间周期上应用移动平均线指标也是类似方式。

移动平均线按时间周期长短分为:短期移动平均线,中期移动平均线,长期移动平均线;按计算方法分为:算术移动平均线,加权移动平均线,指数平滑移动平均线(EMA)

下面正式开始编写策略代码,我们使用jupyer作为研究环境,首先先导入依赖模块

import pandas as pd
import numpy as np
import tushare as ts

%matplotlib inline

接下来使用tushare下载500ETF的历史数据,500ETF是从2013年开始上市交易的,这里将start参数设置为2013,这样可以获取500ETF的全部历史数据。

etf500 = ts.get_k_data('510500',start='2013')
etf500.set_index(pd.to_datetime(etf500['date']),inplace=True) 
del etf500['date']
etf500.head()

输出结果如下,数据是从2013年3月15日开始的:

date open close high low volume code
2013-03-15 0.967 0.970 0.985 0.955 3259273.0 510500
2013-03-18 0.955 0.954 0.972 0.953 936962.0 510500
2013-03-19 0.956 0.960 0.960 0.941 1080499.0 510500
2013-03-20 0.960 0.985 0.986 0.958 501195.0 510500
2013-03-21 0.985 0.995 0.996 0.981 698243.0 510500

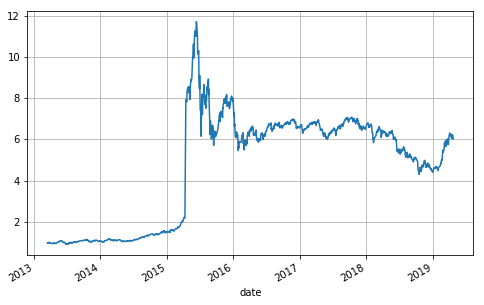
继续画出收盘价格曲线,对500ETF走势有个大概的了解。

etf500['close'].plot(grid=True, figsize=(8,5))

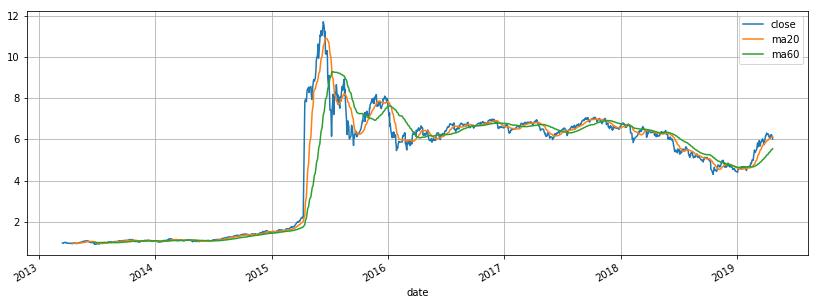
接下来是双均线策略的实现,我们使用20日均线和60日均线作为短期和长期均线,下面先分别计算20日和60日均线序列

etf500['ma20'] = etf500['close'].rolling(20).mean()
etf500['ma60'] = etf500['close'].rolling(60).mean()
etf500[['close','ma20','ma60']].plot(grid=True, figsize=(14,5))

我们已经获取了两条移动平均线序列,接下来是根据均线来生成交易信号

策略信号会有两种状态:

  1. 买入信号,当20日均线向上穿过60日均线时持有多头仓位

  2. 卖出信号,当20日均线向下穿过60日均线时平仓

etf500['Stance'] = np.where(etf500['ma20'] - etf500['ma60'] > 0, 1, 0)
etf500['Stance'].value_counts()

最后一行统计持仓和空仓的天数,输出结果如下:

1    761
0    724
Name: Stance, dtype: int64
etf500['Stance'].plot(ylim=[-0.1,1.1])

下图显示持仓日期数据

接下来,我们根据持仓数据来计算持仓的收益

etf500['Market Returns'] = np.log(etf500['close'] / etf500['close'].shift(1))
etf500['Strategy'] = etf500['Market Returns'] * etf500['Stance'].shift(1)
etf500[['Market Returns','Strategy']].cumsum().plot(grid=True,figsize=(8,5))

以上图片展示了市场回报率与策略回报曲线,可以看到20和60日双均线策略并没有跑赢500ETF,不过我们也可以测试下其他均线组合,也许会有不错的效果。

参考

https://www.pythonforfinance.net/2016/09/01/moving-average-crossover-trading-strategy-backtest-in-python/#more-15498>

Python量化交易实战
欢迎您扫码订阅我的微信公众号: pyquant

我的微信公众号:pyquant

背景

开发股票行情推送的引擎时遇到一个问题,在9:30开盘后的一段时间内行情消息总是堆积,尤其是开头15-20分钟,堆积的数据量会越来越多,经过debug发现是内部消息传输使用Queue性能问题导致了消息延迟,在stackoverflow上找到一个帖子对Queue的性能进行了测试和解释说明,下面先来介绍下Multiprocessing下的Queue和Pipe

介绍

当使用多个进程时,通常使用消息传递来进行进程之间的通信,为了不损耗性能也会尽量避免使用同步机制。对于消息传递:

* Pipe适用于两个进程间的消息传递。
* Queue适用于多个进程间的消息传递,适用于多生产者和消费者的模式。

Pipe VS Queue

from multiprocessing import Process, Pipe
import time

def reader_proc(pipe):
    ## Read from the pipe; this will be spawned as a separate Process
    p_output, p_input = pipe
    p_input.close()  # We are only reading
    while True:
        msg = p_output.recv()  # Read from the output pipe and do nothing
        if msg == 'DONE':
            break

def writer(count, p_input):
    for ii in range(0, count):
        p_input.send(ii)  # Write 'count' numbers into the input pipe
    p_input.send('DONE')

if __name__ == '__main__':
    for count in [10 ** 4, 10 ** 5, 10 ** 6]:
        # Pipes are unidirectional with two endpoints:  p_input ------> p_output
        p_output, p_input = Pipe()  # writer() writes to p_input from _this_ process
        reader_p = Process(target=reader_proc, args=((p_output, p_input),))
        reader_p.daemon = True
        reader_p.start()  # Launch the reader process

        p_output.close()  # We no longer need this part of the Pipe()
        _start = time.time()
        writer(count, p_input)  # Send a lot of stuff to reader_proc()
        p_input.close()
        reader_p.join()
        print("Sending {0} numbers to Pipe() took {1} seconds".format(count,
                                                                      (time.time() - _start)))

Pipe输出结果

Sending 10000 numbers to Pipe() took 0.0744009017944336 seconds
Sending 100000 numbers to Pipe() took 0.7794349193572998 seconds
Sending 1000000 numbers to Pipe() took 7.425454139709473 seconds
from multiprocessing import Process, Queue
import time
import sys

def reader_proc(queue):
    ## Read from the queue; this will be spawned as a separate Process
    while True:
        msg = queue.get()  # Read from the queue and do nothing
        if (msg == 'DONE'):
            break

def writer(count, queue):
    ## Write to the queue
    for ii in range(0, count):
        queue.put(ii)  # Write 'count' numbers into the queue
    queue.put('DONE')

if __name__ == '__main__':
    pqueue = Queue()  # writer() writes to pqueue from _this_ process
    for count in [10 ** 4, 10 ** 5, 10 ** 6]:
        ### reader_proc() reads from pqueue as a separate process
        reader_p = Process(target=reader_proc, args=((pqueue),))
        reader_p.daemon = True
        reader_p.start()  # Launch reader_proc() as a separate python process

        _start = time.time()
        writer(count, pqueue)  # Send a lot of stuff to reader()
        reader_p.join()  # Wait for the reader to finish
        print("Sending {0} numbers to Queue() took {1} seconds".format(count,
                                                                       (time.time() - _start)))

Queue 输出结果

Sending 10000 numbers to Queue() took 0.2558887004852295 seconds
Sending 100000 numbers to Queue() took 2.4320709705352783 seconds
Sending 1000000 numbers to Queue() took 23.602338075637817 seconds

让我们把结果整理成表格方便对比查看:

循环次数 Pipe Queue
10000 0.0744 0.2558
100000 0.7794 2.4320
1000000 7.4254 23.6023

通过对比测试可以发现,Pipe性能大约为Queue的3倍,所以在仅有两端通信的情况下应该优先使用Pipe。

源码分析

通过阅读Queue的源码,我们可以发现,其实在Queue内部是用Lock来实现对Pipe的安全读写操作的。所以相比于Pipe会有额外的锁的开销。

class Queue(object):

    def __init__(self, maxsize=0, *, ctx):
        if maxsize <= 0:
            # Can raise ImportError (see issues #3770 and #23400)
            from .synchronize import SEM_VALUE_MAX as maxsize
        self._maxsize = maxsize
        self._reader, self._writer = connection.Pipe(duplex=False) # 这里初始化了Pipe对象
        self._rlock = ctx.Lock()
        self._opid = os.getpid()
        if sys.platform == 'win32':
            self._wlock = None
        else:
            self._wlock = ctx.Lock()
        self._sem = ctx.BoundedSemaphore(maxsize)
        # For use by concurrent.futures
        self._ignore_epipe = False
        self._after_fork()
        if sys.platform != 'win32':
            register_after_fork(self, Queue._after_fork)

    def put(self, obj, block=True, timeout=None):
        if self._closed:
            raise ValueError(f"Queue {self!r} is closed")
        if not self._sem.acquire(block, timeout):
            raise Full

        with self._notempty:
            if self._thread is None:
                self._start_thread()
            self._buffer.append(obj)
            self._notempty.notify()

    def get(self, block=True, timeout=None):
        if self._closed:
            raise ValueError(f"Queue {self!r} is closed")
        if block and timeout is None:
            with self._rlock:
                res = self._recv_bytes()
            self._sem.release()
        else:
            if block:
                deadline = time.monotonic() + timeout
            if not self._rlock.acquire(block, timeout):
                raise Empty
            try:
                if block:
                    timeout = deadline - time.monotonic()
                    if not self._poll(timeout):
                        raise Empty
                elif not self._poll():
                    raise Empty
                res = self._recv_bytes()
                self._sem.release()
            finally:
                self._rlock.release()
        # unserialize the data after having released the lock
        return _ForkingPickler.loads(res)

参考

https://stackoverflow.com/questions/8463008/multiprocessing-pipe-vs-queue

Python量化交易实战
欢迎您扫码订阅我的微信公众号: pyquant

我的微信公众号:pyquant

virtualenv是python虚拟软件环境的管理工具,用于创建和删除虚拟环境

特性

  1. 隔离性,将python软件环境打包安装到单独的目录下,可以以项目或者脚本为单位单独创建虚拟环境,防止项目间模块版本混乱和冲突的问题。
  2. 易用性,通过一行命令即可创建虚拟环境,在虚拟环境之间切换也非常简单

安装virtualenv

pip install virtualenv

使用介绍

virtualenv --help

比较有用的几个参数:

  • -p PYTHON_EXE, --python=PYTHON_EXE,指定虚拟环境中的python版本
  • –system-site-packages, 创建的虚拟环境将使用连接的方式,添加系统默认python环境中的site-packages
  • –always-copy,使用copy的方式代替连接来添加系统默认python已安装模块

创建虚拟环境

mkdir myproject
cd myproject
virtualenv --p python3.6 venv

激活和退出虚拟环境

激活虚拟环境,系统激活之后,提示符前端有个(venv)的前缀,表示系统已经切换到venv虚拟环境目录下

source venv/bin/activate

在venv环境下,安装模块可以使用pip来进行

退出虚拟环境,退出后系统将自动选择系统默认的Python解释器,提示符前缀的(venv)也会消失

deactivate

删除虚拟环境

由于每个虚拟环境是独立部署的,所以直接将虚拟环境目录rm就可以完成清理

其他

virtualenvwrapper是virtualenv的扩展管理包,用于更方便管理虚拟环境,它可以做:

  • 将所有虚拟环境整合在一个目录下
  • 管理(新增,删除,复制)虚拟环境
  • 切换虚拟环境

另外,从python3.3之后,virtualenv已经作为python模块venv提供使用,具体信息可以参考一下网址:

https://docs.python.org/3/library/venv.html

参考

Python量化交易实战
欢迎您扫码订阅我的微信公众号: pyquant

我的微信公众号:pyquant

使用的docker镜像是 https://github.com/stilliard/docker-pure-ftpd

创建步骤如下

docker pull stilliard/pure-ftpd:hardened

docker run -d -e FTP_USER_NAME=test -e FTP_USER_PASS=test --name ftpd_server -p 21:21 -e FTP_PASSIVE_PORTS=45020:45100 --expose=45020-45100 -p 45020-45100:45020-45100 -v /home/test:/home/ftpusers -e "PUBLICHOST=10.168.2.178" -e FTP_USER_HOME=/home/ftpusers stilliard/pure-ftpd:hardened

注意:FileZilla传输模式需要选择“主动”

提供的参数解释说明

/usr/sbin/pure-ftpd # path to pure-ftpd executable
-c 5 # --maxclientsnumber (no more than 5 people at once)
-C 5 # --maxclientsperip (no more than 5 requests from the same ip)
-l puredb:/etc/pure-ftpd/pureftpd.pdb # --login (login file for virtual users)
-E # --noanonymous (only real users)
-j # --createhomedir (auto create home directory if it doesnt already exist)
-R # --nochmod (prevent usage of the CHMOD command)
-P $PUBLICHOST # IP/Host setting for PASV support, passed in your the PUBLICHOST env var
-p 30000:30009 # PASV port range (10 ports for 5 max clients)
-tls 1 # Enables optional TLS support
Python量化交易实战
欢迎您扫码订阅我的微信公众号: pyquant

开启/关闭ufw

ufw enable
ufw disable

允许某端口被访问

ufw allow 80

禁止某端口被访问

ufw deny 8888

添加规则

允许10.168.2.137访问30004端口

ufw allow from 10.168.2.137 to any port 30004

插入规则

在第二条位置插入规则,允许192.168.1.1访问8888端口

ufw insert 2 allow from 192.168.1.1 to any port 8888

按编号显示规则

ufw status numbered

按编号删除规则

ufw delete 编号

Python量化交易实战
欢迎您扫码订阅我的微信公众号: pyquant

我的微信公众号:pyquant

在写代码时经常会遇到对抛出异常的代码进行重试,常见于网页爬虫的代码中,使用计数器 + 循环的方式对抛出异常的代码进行捕获和重试。tenacity是使用Python装饰器模式对方法异常进行捕获,通过灵活的参数实现简单优雅的异常重试。

特性:

  1. 简单灵活的装饰模式api
  2. 可以指定重试停止条件(比如:设置重试次数)
  3. 也可以指定等待条件(比如:使用指数避让间隔重试)
  4. 自定义触发重试的Exception
  5. 自定义重试预期的返回结果
  6. 基于协程的重试

安装方式:

pip install tenacity

API使用介绍

1. @retry

给需要重试的方法加上@retry修饰器之后,方法抛出异常就会被装饰器捕获到并进行重试,异常抛出时会不断重试直到方法成功返回

@retry
def never_give_up_never_surrender():
    print("Retry forever ignoring Exceptions, don't wait between retries")
    raise Exception

2. 带终止条件的retry

我们也可以给retry加一个参数设置重试n次后不再重试并抛出异常

@retry(stop=stop_after_attempt(7))
def stop_after_7_attempts():
    print("Stopping after 7 attempts")
    raise Exception

使用@stop_after_delay 可以指定重试间隔,比如如下的例子指定10秒后重试

@retry(stop=stop_after_delay(10))
def stop_after_10_s():
    print("Stopping after 10 seconds")
    raise Exception

可以使用 “|” 把多个条件组合起来

@retry(stop=(stop_after_delay(10) | stop_after_attempt(5)))
def stop_after_10_s_or_5_retries():
    print("Stopping after 10 seconds or 5 retries")
    raise Exception

3. 在重试前等待

使用@wait_fixed 在重试前等待固定时间

@retry(wait=wait_fixed(2))
def wait_2_s():
    print("Wait 2 second between retries")
    raise Exception

随机等待1-2秒钟,这在爬虫爬网页时比较有用

@retry(wait=wait_random(min=1, max=2))
def wait_random_1_to_2_s():
    print("Randomly wait 1 to 2 seconds between retries")
    raise Exception

增加指数避让等待间

@retry(wait=wait_exponential(multiplier=1, min=4, max=10))
def wait_exponential_1():
    print("Wait 2^x * 1 second between each retry starting with 4 seconds, then up to 10 seconds, then 10 seconds afterwards")
    raise Exception
    
@retry(wait=wait_fixed(3) + wait_random(0, 2))
def wait_fixed_jitter():
    print("Wait at least 3 seconds, and add up to 2 seconds of random delay")
    raise Exception

看一个更复杂点的例子

@retry(wait=wait_chain(*[wait_fixed(3) for i in range(3)] +
                       [wait_fixed(7) for i in range(2)] +
                       [wait_fixed(9)]))
def wait_fixed_chained():
    print("Wait 3s for 3 attempts, 7s for the next 2 attempts and 9s for all attempts thereafter")
    raise Exception

4. 带触发条件的retry语句

@retry(retry=retry_if_exception_type(IOError))
def might_io_error():
    print("Retry forever with no wait if an IOError occurs, raise any other errors")
    raise Exception

def is_none_p(value):
    """Return True if value is None"""
    return value is None

@retry(retry=retry_if_result(is_none_p))
def might_return_none():
    print("Retry with no wait if return value is None")
    
@retry(retry=(retry_if_result(is_none_p) | retry_if_exception_type()))
def might_return_none():
    print("Retry forever ignoring Exceptions with no wait if return value is None")

5. 异常处理

虽然tenacity会帮我们处理异常,我们依然可以在重试失败后使用reraise来决定我们时候进行最后的尝试,使用reraise会把异常抛出交给我们的try except来处理

@retry(reraise=True, stop=stop_after_attempt(3))
def raise_my_exception():
    raise MyException("Fail")

try:
    raise_my_exception()
except MyException:
    # timed out retrying
    pass

6. 在retry前后增加log

logger = logging.getLogger(__name__)

@retry(stop=stop_after_attempt(3), before=before_log(logger, logging.DEBUG))
def raise_my_exception():
    raise MyException("Fail")
    
@retry(stop=stop_after_attempt(3), after=after_log(logger, logging.DEBUG))
def raise_my_exception():
    raise MyException("Fail")
    
@retry(stop=stop_after_attempt(3),
       before_sleep=before_sleep_log(logger, logging.DEBUG))
def raise_my_exception():
    raise MyException("Fail")

7. 统计异常情况

@retry(stop=stop_after_attempt(3))
def raise_my_exception():
    raise MyException("Fail")

try:
    raise_my_exception()
except Exception:
    pass

print(raise_my_exception.retry.statistics)

输出如下内容:

{'start_time': 283085.571804807, 'attempt_number': 3, 'idle_for': 0, 'delay_since_first_attempt': 0.0002240639878436923}

8. 自定义异常回调函数

from tenacity import stop_after_attempt, retry_if_result, retry

def return_last_value(retry_state):
    """return the result of the last call attempt"""
    return retry_state.result()

def is_false(value):
    """Return True if value is False"""
    return value is False

# will return False after trying 3 times to get a different result
@retry(stop=stop_after_attempt(3),
       retry_error_callback=return_last_value,
       retry=retry_if_result(is_false))
def eventually_return_false():
    return False

print(eventually_return_false())

输出结果为 False

项目Git地址

https://github.com/jd/tenacity

Python量化交易实战
欢迎您扫码订阅我的微信公众号: pyquant

我的微信公众号:pyquant

最近某天突然登录服务器变的很慢,输入ssh命令后大概要多10多秒钟才连上服务器(设置了免密码登录),并且登录之后切换到root用户也要等很久,网上搜索发现也有其他人遇到类似问题,尝试了网上提到的设置ssh_config和sshd_config的某些参数没有明显变化,登录服务器依旧很慢,最终发现问题还是通过自己排查,这里记录下排查过程。

先执行ssh命令登录服务器,增加 -v 参数打印debug信息:

ssh -v xuqi@10.168.2.178

发现在执行到“debug1: pledge: network” 这步时卡住很久,再google一次,找到了解决办法,执行如下命令后,登录时间明显缩短到约2秒钟

systemctl restart systemd-logind

大致的原因是dbus服务由于某些原因重启后,也必须重启systemd服务,否则就会出现这个bug。

参考

https://serverfault.com/questions/792486/ssh-connection-takes-forever-to-initiate-stuck-at-pledge-network

Python量化交易实战
欢迎您扫码订阅我的微信公众号: pyquant